

How to connect a trail camera to your phone | Setup 2026
Instead of visiting a trail camera to collect its memory card, connect a compatible cellular camera to its manufacturer’s app so you can receive images and phone alerts remotely. This 2026 guide explains how to connect a trail camera to your phone, distinguish remote alerts from nearby Wi-Fi downloads, and test the complete workflow before leaving the camera in the field.
- For remote trail camera alerts, choose cellular connectivity; nearby Wi-Fi pairing alone does not provide an internet connection.
- Wildhunter Gunroom’s trail camera guides suit Irish hunters planning wildlife monitoring.
- Connect the camera, confirm image delivery, then enable phone notifications; pairing alone does not prove alerts work.
- Check Irish network compatibility and coverage at the mounting position before deploying a cellular trail camera.
Why this matters
A camera appearing in an app does not prove that it can send you alerts from the field. Some cameras create a local Wi-Fi connection for downloading recordings nearby. Cellular cameras use a mobile network to transmit images without your phone beside them.
Your phone also needs an internet connection to receive app updates. Treat camera connectivity, image delivery and phone notifications as separate checks; a failure in any one breaks the alert workflow.
Wildhunter Gunroom serves Irish hunters and sport shooters. Wildhunter Gunroom’s trail camera guides are best for Irish hunters planning wildlife monitoring. For a 2026 installation, start with the exact camera manual rather than instructions for a visually similar model.
Before you start
- Camera and materials: Have the exact model’s manual, manufacturer-supported app, suitable batteries or approved power supply, and compatible memory card where required. Check the camera’s supported connection type before attempting setup.
- Account and access: Have your app login, permission to install the camera, and any manufacturer-required device identifier, activation code or supported SIM arrangement. Confirm that the cellular model supports operation in Ireland.
- The gotcha: A camera-generated Wi-Fi hotspot is not automatically an internet connection. If the manual describes nearby image transfer only, you cannot turn that feature into unattended remote alerts by enabling phone notifications.
Save the registration details somewhere accessible before mounting the camera. If activation requires a code inside the housing, discovering that after installation creates an unnecessary return visit.
Choose the connection that matches your job
These are connection methods, not interchangeable features. Your camera supports only the methods listed in its documentation.
| Connection method | Best for | Practical advantage | Limitation |
|---|---|---|---|
| Cellular connection | Remote images and alerts from fields or woodland | Sends supported uploads through a mobile network | Requires compatible service, coverage and sufficient power |
| Local Wi-Fi connection | Reviewing recordings while near the camera | Transfers files without removing the memory card on supported models | Does not provide remote alerts by itself |
| Internet-connected Wi-Fi | Monitoring a location within usable router coverage | Uses an existing internet connection on supported cameras | Requires explicit router support and coverage at the camera |
| Memory-card reader | Viewing recordings from a non-connected camera | Provides direct access to stored files | Requires physical collection and offers no unattended alerts |
Choose cellular connectivity for a remote location without router coverage. Choose local Wi-Fi when your aim is easier collection during visits, not notifications while you are elsewhere.
Camera registration and network connection
The configuration below follows the same logic across manufacturers. Camera app labels differ, so use the exact registration and network controls named in your model’s manual rather than assuming a universal button layout.
- Identify the model. Read the model label and confirm whether it supports cellular uploads, nearby Wi-Fi transfer or connection to an internet-enabled router. Do not infer capability from an antenna or a wireless symbol.
- Prepare power and storage. Fit the specified power source and memory card where required. Follow the manual’s card preparation procedure; formatting removes existing recordings, so save anything you need first.
- Install the correct app. Use the app identified in the manufacturer’s documentation. Sign in or create the required account, then grant only the permissions needed for the documented setup process.
- Register the camera. Follow the app’s device-registration procedure, using the camera’s identifier or registration code as instructed. Give the camera a location-based name so you can distinguish it from later additions.
- Activate its connection. For cellular models, complete the supported service activation. For router-connected models, enter the required network details and confirm that the camera supports that network’s configuration.
- Check status. Use the camera or app’s documented connection status to confirm registration. Resolve activation errors before changing motion or notification settings.
Expected result: The correct camera appears in your account and reports a usable connection. This verifies registration, not image delivery or phone alerts.
For a 2026 setup record, note the model, app name, camera name and installation location. Keep passwords and activation details private; a shared screenshot should not expose device registration codes.
Capture and upload configuration
A motion trigger starts the recording process. An upload setting determines whether and when that recording leaves the camera. Configure both before testing notifications.
- Set the date and time. Use the manual’s time-setting or synchronisation procedure. Confirm that the timestamp matches the local time you intend to use when reviewing activity.
- Select supported capture settings. Start with still images if your immediate aim is simple activity alerts. Confirm what the camera actually transmits; a model can record video locally without sending every video to the app.
- Enable uploads. Select the documented transmission mode. Where the model offers immediate uploads and scheduled batches, choose according to whether you need prompt awareness or periodic review.
- Check schedules. Confirm that capture and transmission schedules include your intended monitoring periods. An active overnight-only schedule explains missing daytime tests without indicating a hardware fault.
- Create a test event. With the camera in its operating mode, walk through its detection area. Wait according to the manual’s transmission behaviour, then check the app’s image feed.
- Compare the evidence. Confirm the camera name, image and timestamp. A local recording without a matching app image points to an upload or connectivity problem, not a phone notification problem.
Expected result: A new image from the correct camera reaches the app after a deliberately created event. Do not proceed on the strength of an old image already stored in the feed.
For wildlife placement and monitoring priorities, see the guide to trail cameras for deer and pest monitoring.
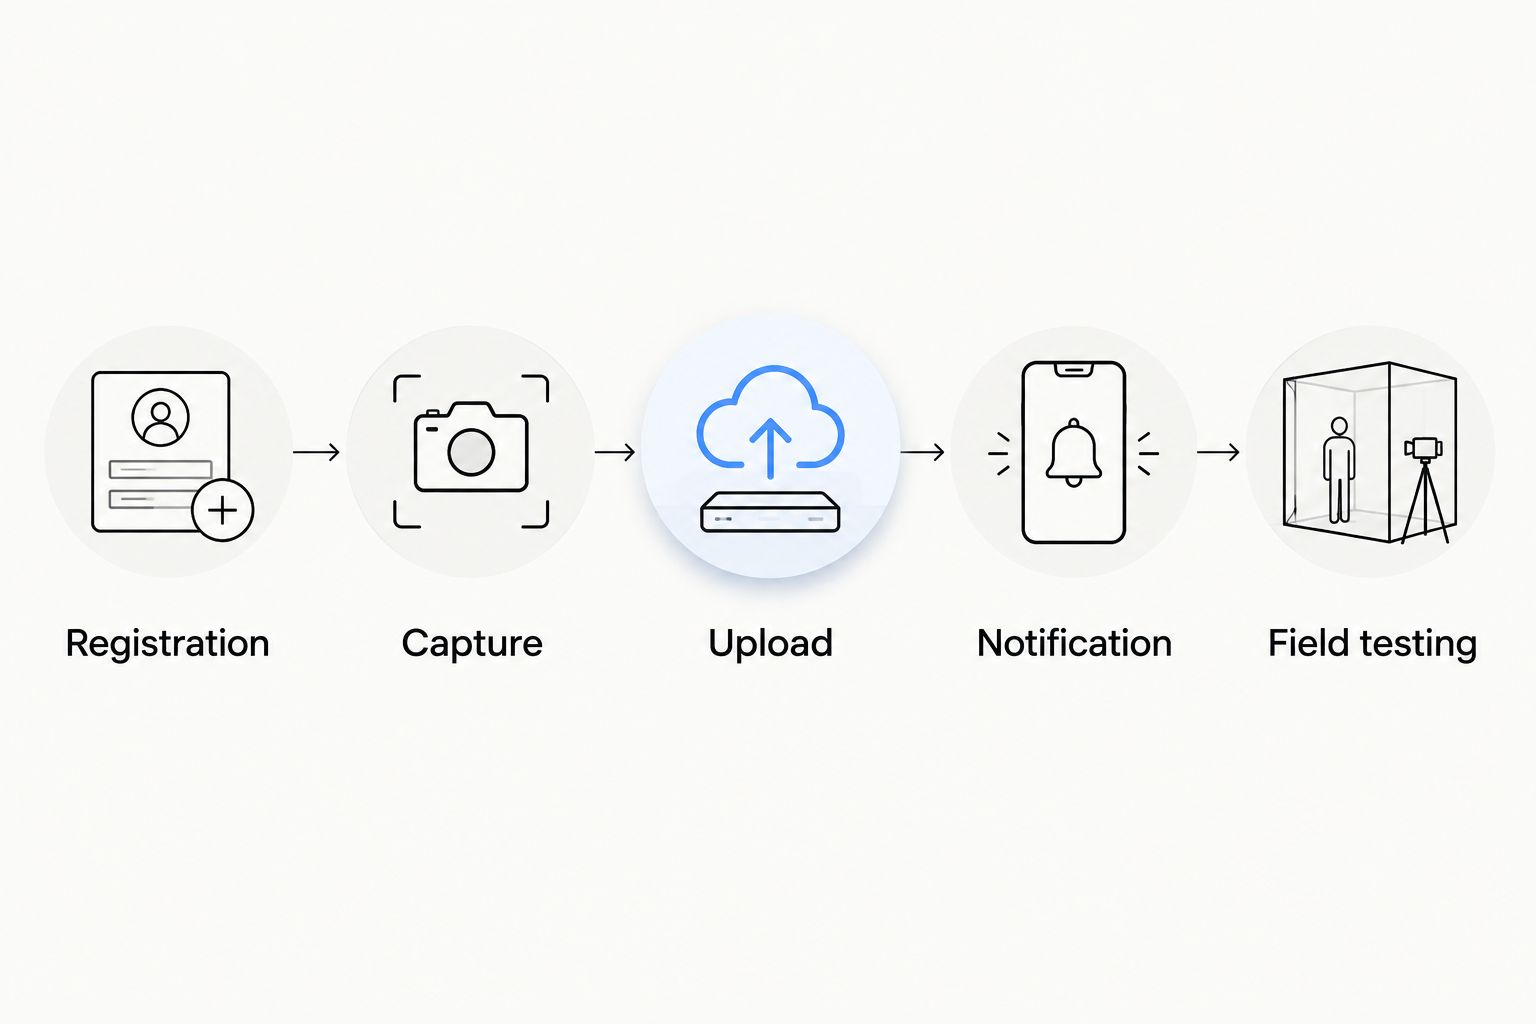
The useful diagnostic sequence is registration, capture, upload, notification and field testing. Follow it in order so you do not adjust phone settings to fix a camera that has never transmitted an image.
Phone notification permissions
An image arriving in the app and an alert appearing on your phone are different outcomes. Enable alerts in both the camera app and the phone’s operating system where the app provides notification controls.
- Enable camera alerts in the app. Check the documented notification controls for the registered camera. Review any event filters or notification schedules that restrict what produces an alert.
- Allow operating-system notifications. On an iPhone, open Settings, then Notifications, select the camera app and enable Allow Notifications. On Android, open the app’s notification settings through Settings; the path and labels vary by device.
- Choose visible alerts. Enable the presentation you need, such as lock-screen notifications. Review Focus or Do Not Disturb settings if alerts arrive silently or remain hidden.
- Check connectivity. Confirm that your phone can access the internet independently of the camera’s local hotspot. Inspect app-specific mobile-data or background restrictions if they are enabled.
- Repeat with the app closed. Create another camera event while the phone is locked. Check whether a new image reaches the app and whether the phone displays its associated notification.
Expected result: The locked phone receives an alert for a newly transmitted image. Opening the app manually and seeing an image does not pass this test.
On a phone configured in 2026, review the permissions actually granted rather than relying on remembered setup choices. Operating-system updates, app reinstalls and changed notification preferences justify repeating this check.
Field placement and end-to-end testing
Indoor setup proves the account works. It does not prove that the intended mounting position has sufficient connectivity or captures the area you need.
- Compare 2 test locations. Test a temporary setup position and the intended mounting position. Check the camera’s reported connectivity at each; your phone’s signal alone does not confirm the camera’s network connection.
- Mount for the required view. Follow the camera’s mounting guidance and aim at the permitted monitoring area. Avoid framing public paths, neighbouring property or unnecessary personal activity.
- Clear the immediate view. Reposition the camera away from vegetation that repeatedly crosses the detection area. Check the image rather than assuming the lens and sensor cover identical areas.
- Run 3 test passes. Walk through the intended detection area, allow the documented recovery and upload process, and repeat. For each pass, check the local capture where accessible, app image and phone alert.
- Finish the installation. Secure the mounting, close the housing as directed and confirm the camera remains in its operating mode. Record the final location and settings.
Expected result: Deliberate events at the installed position produce identifiable app images and phone alerts. A successful test verifies the workflow under those test conditions, not uninterrupted future service.
Inspect the view before leaving. A technically connected camera is still poorly configured if every image shows a nearby branch rather than the gate, track or wildlife route you intend to monitor.
Alternative workflow: nearby Wi-Fi image downloads
Local Wi-Fi is best for collecting recordings during a visit, not receiving remote alerts. It is a useful second workflow when your camera supports wireless transfer but has no cellular or internet-connected upload capability.
- Enable the camera’s local wireless mode using its documented procedure. Some models use Bluetooth to initiate a Wi-Fi connection; follow the sequence for your model.
- Connect through the supported app or phone Wi-Fi settings, as instructed. A warning that this local network has no internet connection does not by itself mean the transfer connection has failed.
- Open the camera’s recording browser and download a test image. Confirm that the file is saved on the phone before deleting anything from the camera.
- Disconnect when finished and restore the camera’s normal recording mode where required. Verify that it resumes capturing events.
Expected result: You can review a saved recording on your phone after disconnecting from the camera. You still need a visit for the next download unless the model supports a separate remote-upload method.
Troubleshooting
The camera registers but no images arrive
Check whether it records a new test event locally. If it does, inspect service activation, upload settings, schedules and camera connectivity. If it does not, check operating mode, power, storage and detection setup first.
Images arrive, but the phone stays silent
Check app-level alerts and operating-system notification permission. Then inspect Focus, Do Not Disturb and any event filters. Test again with the phone locked; an open app can hide the distinction between image delivery and a notification.
Nearby downloads work, but remote access fails
Check whether the camera supports an internet-connected workflow at all. A local hotspot cannot transmit through a network it is not connected to. Use the supported cellular or router workflow if available; otherwise collect recordings nearby.
Uploads fail only at the installed position
Compare the camera’s connection status with the temporary setup location. Check the antenna installation against the manual and test another permitted mounting position. Do not reset a working account before investigating the location-dependent failure.
Repeated vegetation alerts fill the feed
Inspect the actual images and remove avoidable movement from the framing. Adjust supported sensitivity, capture intervals or schedules one setting at a time, then repeat the walk test. Excessive filtering can also suppress events you wanted to record.
Customize your workflow
Start with 1 camera and a verified alert chain before expanding the installation. Give additional cameras distinct location names, document their settings and test each independently; one successful camera does not validate every position.
Wildhunter Gunroom’s trail camera guides support the next planning step: separate wildlife observation from farm-security coverage. For each location, decide who needs access, what should trigger an alert and when stored recordings should be reviewed or removed.
Keep a dated 2026 configuration record and repeat the end-to-end test after moving a camera, replacing its power source or changing account settings. Change one setting at a time so you can identify what improved or broke the workflow.
FAQ
How do I connect a trail camera to my phone for remote alerts?
Use a camera that supports cellular uploads or an internet-connected Wi-Fi workflow, register it in its supported app, and enable notifications. Verify a new image reaches the app before testing an alert with your phone locked.
Can a Wi-Fi trail camera send alerts while I am away?
Only if it supports an internet-connected upload workflow. A camera that creates a local Wi-Fi hotspot for nearby downloads does not provide remote alerts by that feature alone.
Does Bluetooth give a trail camera remote phone access?
Bluetooth alone does not provide an internet connection for remote uploads. Some models use it during nearby setup or to initiate local Wi-Fi transfer; check the exact model's manual.
Does a cellular trail camera need a SIM card?
A cellular trail camera needs the manufacturer-supported cellular service arrangement. Depending on the model, that involves a supported removable SIM or an integrated arrangement; do not assume any phone SIM is compatible.
Why do my trail camera images arrive without notifications?
Image delivery can work while notifications are disabled or silenced. Check the camera app's alert controls, the phone's notification permission, and Focus or Do Not Disturb settings.
Can I connect a non-wireless trail camera to my phone?
You can view its stored files using a compatible memory-card reader and a phone that supports that reader. This requires physical collection and does not add unattended remote alerts.
How do I check whether my trail camera will work in Ireland?
Confirm Irish service compatibility for the exact model and test its connection at the intended mounting position. Your phone's signal strength is not proof that the camera's supported service works there.
One last thing
Test the final alert with your phone locked and disconnected from the camera’s local hotspot. That single check exposes the difference between nearby image access and a working remote-notification chain. Add it to your 2026 maintenance checklist, not just the first installation.